


Summary
Apple verification failed in a different situation, and the cause of the failure is different also, but if you locked out of iPhone after iCloud verification failed, apart from the correct Apple ID and password, you can also Apple ID password verification failed issue with EelPhone Activation Lock Removal.
Considering the safety of the iPhone, iPhone always pops up the window to verify the Apple ID, you should enter the correct Apple ID and password to bypass the verification. Verification failed Apple for an unknown reason, some Apple ID verification can be bypassed by clicking on the Not Now button, but almost Apple ID verification can't be bypassed, you must enter the correct Apple ID and password.
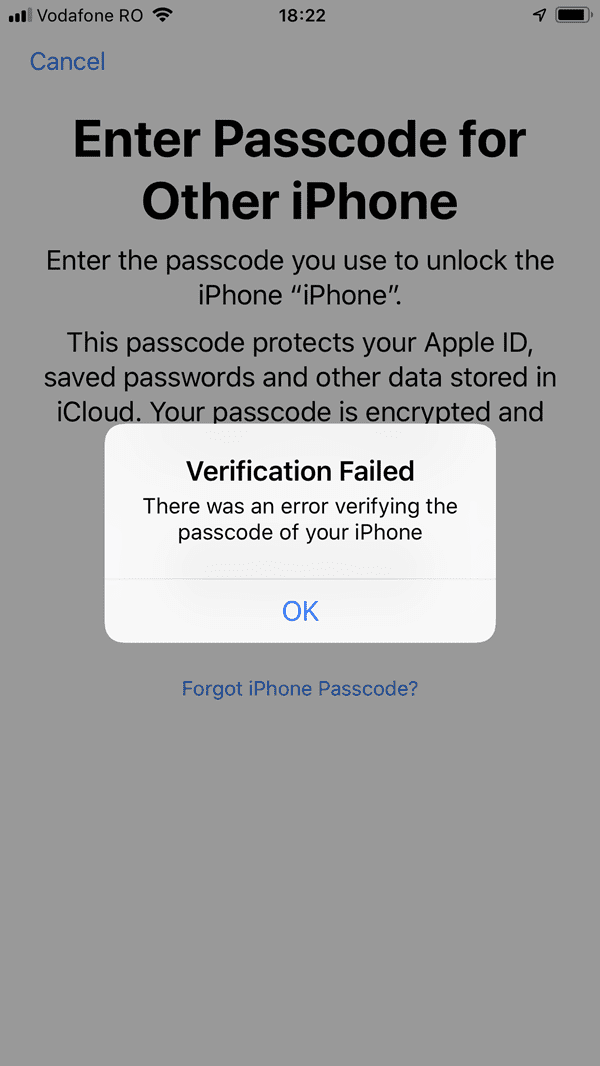
If Apple ID verification failed unknown error, find out the exact cause of the error, get the solution to fix the verification failed iPhone.
Part 1: Verification Failed iPhone Situation
iPhone will pop up the window to ask you to enter the Apple ID and password, then you can use iPhone. There are different situations that you should verify your Apple ID account.
iCloud Verification Failed
iCloud verification is necessary when you want to restore from your iCloud or when you want to backup to iCloud. Sign in iCloud with the linked Apple ID and password, iCloud verification failed make it impossible to restore/backup iPhone data.
iTunes Verification Failed
iTunes is free for Apple users, it's one link between iPhone and Windows, you should enter the Apple ID and password to link your iPhone to the iTunes, incorrect Apple account will make the iTunes verification failed.
APP Store Verification Failed
App store on your iPhone should be linked to the Apple ID, you should enter the Apple ID and password to sign in app store, then you can download the app from app store. If app store verification failed, the app store is unavailable.
Update Apple ID Settings Verification Failed
When you update Apple ID settings, your iPhone should be linked to the network well. For the Apple ID verification failed issue, “there was an error connecting to the Apple ID server” pops to your iPhone, check the wifi or the cellular connection at the first of, if it doesn't work, find the solution from the next part.
First of all check the network connection, if the network is unavailable, change the cellular to fix verification failed iPhone, if it doesn't work, turn to the second part.
Part 2: How to Fix Verification Failed iPhone
As we inferred above, check the network connection and the correction of the linked Apple ID and password, incorrect Apple ID and password will make the verification failed. Follow those two solutions one by one.
Tip 1: Factory Reset iPhone to Factory Settings
If you're sure that the Apple ID is correct, take the Apple ID and password to iPhone settings, factory reset your iPhone from settings.
Go to Settings>General>Reset>Erase all Data and Settings, enter the Apple ID and password to finish the factory reset process, your iPhone will reboot automatically, set up iPhone one more time.
Note: It's better to backup iPhone data in advance, the factory reset process will erase all data in your iPhone, you can't restore deleted data from iPhone storage then. If the Apple ID was wrong, you can't factory reset iPhone from settings.

Tip 2: Fix Verification Failed iPhone with EelPhone Activation Lock Removal
Wrong Apple ID and password will make the iPhone verification failed, especially for a second hand iPhone/iPad, abnormal factory reset will make iPhone get into activation lock, you should enter the linked Apple ID and password to verify iPhone.
Step 1: Download EelPhone Activation Lock Removal to the computer, choose the exact removal version according to your PC system. For Windows users, you should turn to the guide about how to use EelPhone Activation Lock Removal on Windows
The precaution on the interface is important, if you can accept the precaution, click on the Start button to go on.

Step 2: Connect iDevice to the computer now, the removal will download the jailbreak data package to your iDevice, the activation removal needs the help of jailbreak.

Step 3: What you should do during the data package downloading process is waiting and be patient.

Step 4: Click on the Start Jailbreak button to jailbreak your iDevice once the data package was downloaded with success.

Step 5: Follow the guide on the removal to do some operations, it's necessary for iDevice jailbreak.

Step 6: The iDevice model information will be listed on the removal after the jailbreak process, check and then click on Start Remove to fix verification failed issue.

For MAC, the operation is easier than windows version, because you can jailbreak iDevice almost automatically, but for Windows version, you should jailbreak iDevice manually according to the guide on the removal.
And for “error connecting to Apple ID server” issue, check the network at first, if it doesn't work, call the carrier for help. “verification failed error connecting to Apple ID server” can be caused in many situations, you should try the tips one by one.
Alex Scott
This article was updated on 16 February, 2022

Likes
 Thank you for your feedback!
