


Summary
With the same apple id in different idevice and computers, you can sync iPhone data on a different device. Using the most suitable method to sync iPhone to iTunes or sync iPhone to computer from this article.
Syncing iPhone data(Albums, songs, playlists, movies, TV shows, podcasts, and audiobooks, photos and videos, contacts, and calendars) to iTunes to share exiting data in iPhone to another iDevice, it's one necessary skill when you have several iDevice(iPhone, iPad, iPod, Mac, etc. ).
With the same Apple ID, you can not only sync iPhone to iPad or iPad to iPhone, but you can also sync iPhone to iTunes to manage iPhone data on iTunes. With USB cable or without USB cable, you can sync iPhone to iTunes.
- Part 1: How to Sync iPhone to iTunes With USB Cable
- Part 2: How Do I Sync My iPhone to iTunes With WIFI
- Part 3: How to Sync iPhone to iTunes Automatically
- Part 4: How to Sync iTunes to iPhone
- Part 5: How to Sync iPhone to Computer
Part 1: How to Sync iPhone to iTunes With USB Cable
You have two different ways to sync iPhone to iTunes, backup all data in iPhone to iTunes or select part of data in iPhone to sync it to iTunes selectively.
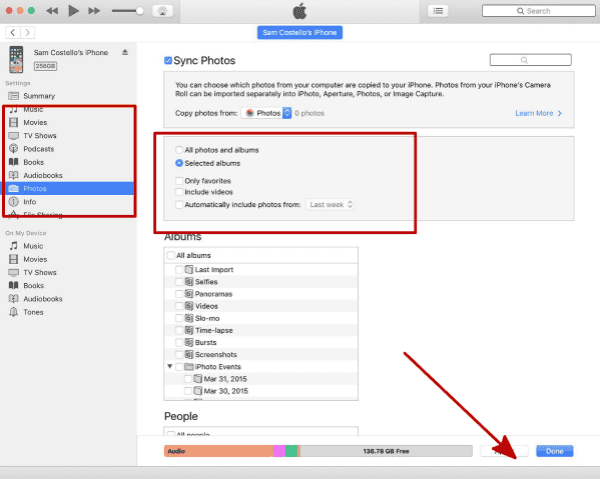
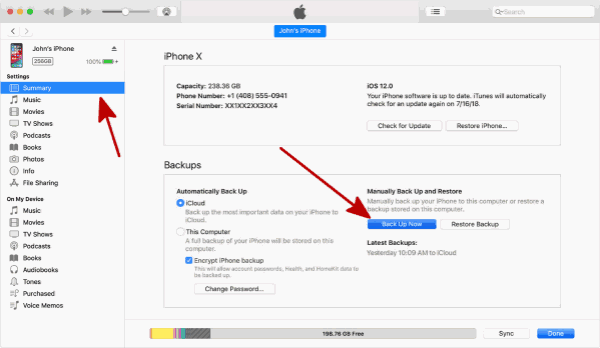
Step 1: Open the computer where you've synced iPhone data to, use the USB cable to link iPhone to computer, enable iTunes in the computer, when you're asked to enter the apple id and apple id password, enter the apple id of iPhone to log in iTunes.
Step 2: Once your iPhone was linked to iTunes, switch to iPhone Summary section to sync iPhone to iTunes.
Step 3: From the left side, there are all data types in iPhone that you can sync to iTunes. Switch to the data type that you want to sync to iTunes. On the interface of the right side, enable the checkbox in front of each selection if you need it.
Step 4: When all is ready, click on the Apply button on the right bottom corner.
How long does it take to sync iPhone to iTunes depends on the data size you've selected to sync. Don't disconnect iPhone and make sure the available network during the whole syncing process.
Part 2: How Do I Sync My iPhone to iTunes With WIFI
It's complex to use the USB cable to connect your iPhone to computer, you can use the WIFI to sync iPhone to iTunes.
Step 1: You should set up “Sync with this [device] over Wi-Fi.” in iTunes at first. Plug iPhone to computer, once iPhone linked to iTunes, turn to Summary, enable “Sync with this [device] over Wi-Fi” and tap on Apply.
Step 2: When your iPhone and iTunes are using the same WIFI account the next time, your iPhone will appear in the iTunes automatically. Select the data types you want to sync to iTunes on the computer without using the USB cable to link iPhone to iTunes.
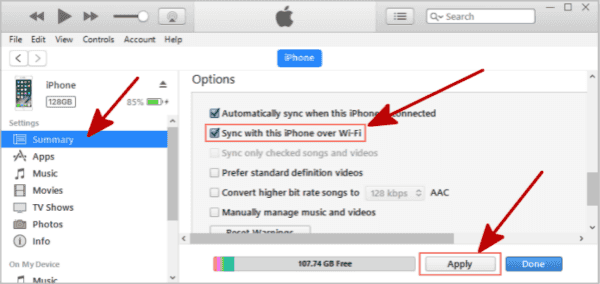
Once your iPhone and iTunes in the same WIFI account, no need of the cable connection, sync iPhone to iTunes on computer directly.
Part 3: How to Sync iPhone to iTunes Automatically
Whatever the method you used to link iPhone to iTunes-with USB cable or with WIFI, you can sync iPhone to iTunes automatically after enabling the “Automatically Sync When this iPhone is connected” settings.
Link iPhone to iTunes with USB cable or WIFI. From the Summary interface, find out the “Automatically Sync When this iPhone is connected” selection. Enable the checkbox before “Automatically Sync When this iPhone is connected”, then tap on Apply button from the bottom right corner.
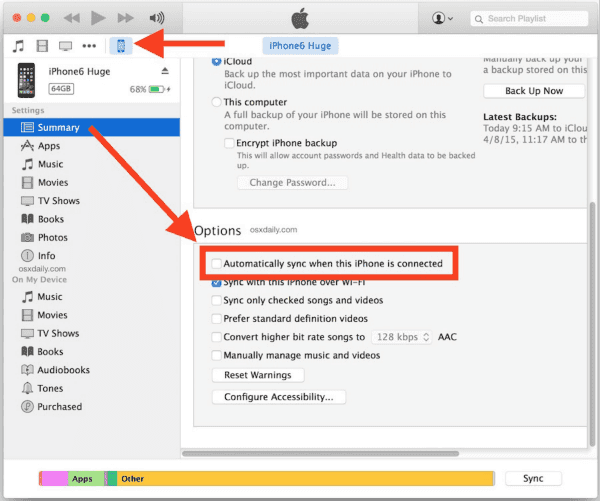
When you enabled the “Automatically Sync When this iPhone is connected” on iTunes, iPhone will sync to iTunes automatically once iPhone connected to iTunes with USB cable or WIFI.
Part 4: How to Sync iTunes to iPhone
How to sync iTunes to iPhone? Restore from the backup file to sync iTunes to iPhone. If you didn't back up your iPhone in advance but synced iPhone to iTunes with the tips above, you can locate the files in your computer, find out the file to restore to iPhone.
Link your iPhone to iTunes with a USB cable or WIFI, from Summary, tap on Restore Backup, select the backup file to restore, all data in the backup file will be restored to iPhone.
Another way is that you can sync iPhone to iTunes with the tips above. It's not easy to locate the synced files on your computer. Move the files from computer to your iPhone to sync iTunes to iPhone.
Part 5: How to Sync iPhone to Computer
How can you locate the files you've synced to iTunes? How to restore backup files to your iPhone directly? Use EelPhone iPhone Transfer to sync iPhone to laptop, at same time, you can restore data from backup file.
The advantages to sync iPhone to PC with EelPhone iPhone Transfer:
1.It's up to you to choose the folder to save the selected files you want to sync to computer.
2.Export files from computer to iPhone with one click also
3.Also the method to sync iPhone to iTunes
Step 1: Download EelPhone iPhone Transfer to computer, after the installation, connect iPhone to computer, it takes a few minutes to load the iPhone data.
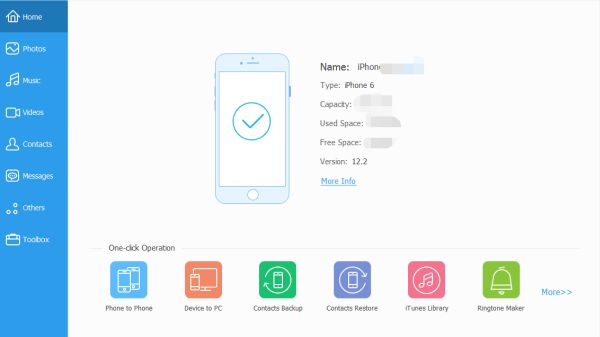
Step 2: From the left side, choose the data type you want to sync to computer.
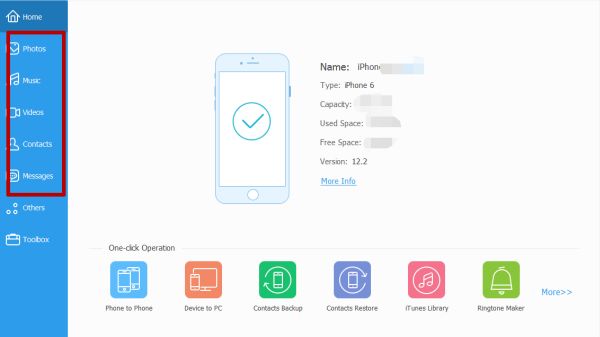
Note: From the bottom on the interface of the software, other available features that you can transfer data to idevice or backup all data in iPhone to computer with one click, etc. It's the quick way to manage data between iPhone and computer.
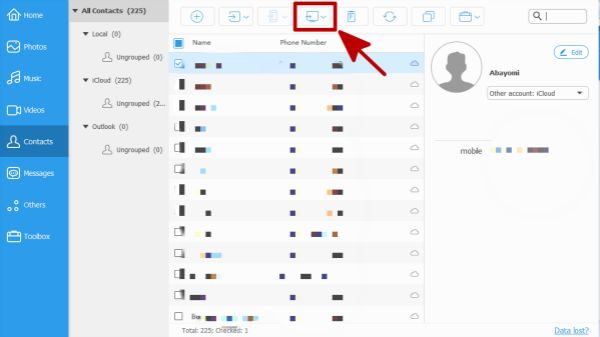
Step 3: Select the data from the scanning result, sync it to computer by tapping on the Export icon on the top of the software.
The folder to save the selected file can be defined by yourself. Several features in one software, manage all data in your iPhone on computer.
It's easy to sync iPhone to PC or iTunes, with the help of iTunes, select the data and sync to iTunes, it's readable but you can't find out the locate on the files you've selected. Sync iPhone to iTunes with the Backup feature on iTunes Summary section, backup and restore iPhone with one click. However, EelPhone iPhone Transfer make it easier to sync part of data in iPhone to computer, the save path of the data on computer is up to you. Choose the suitable method to sync iPhone to computer from all tips above.
Alex Scott
This article was updated on 05 July, 2021

Likes
 Thank you for your feedback!
